
ビルトインの属性ディレクティブ
Angular のテンプレート システムで使えるビルトインの属性ディレクティブは次のものがあります。
- NgClass
- NgStyle
- NgModel
NgModel については、「2 方向 (two-way) バインディング」をみてください。
ここでは、NgModel 以外の使い方をみてみましょう。
NgClass
クラスバインディング では [class.クラス名] = "true/false" で特定の単一の CSS クラスについて、 有効・無効を切り替えることができます。
NgClass は一度に複数の CSS クラスをトグルするときに使います。
「クラスバインディング」で作ったサンプルコードを少し改造してみましょう。
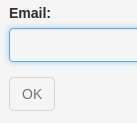
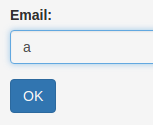
ボタンが無効になったときに、薄い青色になっただけでは有効か無効か分かりにくいので、無効の時には白いボタンに、 有効の時は青いボタンにしましょう。Bootstrap では白いボタン、青いボタンはそれぞれ、btn-default クラス、btn-primary クラスを有効にすることで設定可能です。
NgClass を使うときは、CSS クラス名を属性名に持つオブジェクトを作成し、それを NgClass にバインドします。そして、その属性に対して true / false を切り替えれば、 属性の名前に対応した CSS クラスが有効・無効と切り替わります。
上記スクリーンショットのようにボタンの有効無効を制御する disabled クラスに加え、白色 (=btn-default) と青色 (=btn-primary) も切り替える場合には次のようにします。
テンプレート (src/app/app.component.html) は次の通り。
<div class="container-fluid">
  <form class="form-horizontal" style="margin-top:1em;">
  <div class="form-group">
    <label for="email" class="control-label col-sm-2" >Email:</label>
    <div class="col-sm-3">
      <input #email (keyup)="onKeyup(email.value)" type="email" class="form-control">
    </div>
  </div>
  <div class="form-group">
    <div class="col-sm-offset-2 col-sm-3">
      <button
        class="btn"
        [ngClass]="okButtonClass"
        >OK</button>
    </div>
  </div>
</form>
</div>
コンポーネントのコード (src/app/app.component.ts) は次のようになります。
import { Component, OnInit } from '@angular/core';

@Component({
  selector: 'app-root',
  templateUrl: './app.component.html',
  styleUrls: ['./app.component.css']
})
export class AppComponent implements OnInit{
  okButtonClass = {};
  isButtonDisabled = true;

  ngOnInit(){
    this.setButtonClass();
  }

  onKeyup(s:string){
    console.log(s);
    this.isButtonDisabled = !(s.length > 0);
    this.setButtonClass();
  }

  setButtonClass(){
    this.okButtonClass = {
      'btn-primary': !this.isButtonDisabled,
      'btn-default': this.isButtonDisabled,
      'disabled': this.isButtonDisabled
    }
  }
}
尚、ここではライフサイクルフックの ngOnInit にて、クラスを初期化しています。
NgStyle
こちらも上記のクラスバインディングと似たような話になります。
スタイル・バインディング を使うと、単一の CSS スタイル属性の値を動的に設定することが可能です。
NgStyle を使うと複数の CSS スタイル属性の値を一度に設定することが可能です。
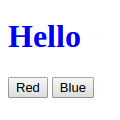
「スタイル・バインディング」のサンプルコードを書き換え、文字の色だけではなく、文字のサイズも動的に設定してみましょう。

コンポーネント (src/app/app.component.ts) は次の通り。
import { Component, OnInit } from '@angular/core';

@Component({
  selector: 'app-root',
  templateUrl: './app.component.html',
  styleUrls: ['./app.component.css']
})
export class AppComponent implements OnInit {
  helloStyles = {};
  fontColor = 'green';
  fontSize = '16px';

  ngOnInit(){
    this.setStyles();
  }

  setStyles(){
    this.helloStyles = {
      'color': this.fontColor,
      'fontSize': this.fontSize
    }
  }

  onClick(color: string, size: string){
    this.fontColor = color;
    this.fontSize = size;
    this.setStyles();
  }
}
テンプレート (src/app/app.component.html) は次の通りです。
<h1><span [ngStyle]="helloStyles">Hello</span></h1>
<div>
  <button (click)="onClick('red', '16px')">Red</button>
  <button (click)="onClick('blue', '32px')">Blue</button>
</div>
このように [ngStyle] にオブジェクトを設定して、それの属性名をスタイルの属性名と同一にします。 そして、スタイルに設定したスタイルオブジェクトの属性値を更新することで、動的に CSS の属性を設定できます。